Saturday 27 December 2014

Benefit Sugarbomb Blusher

Hello Everyone!

I recently got the Sugarbomb blusher from Benefit. I've only recently started using blushers as I used to be paranoid my cheeks were red enough already due to my bad skin... even though I wore foundation so looked completely washed out! I guess that's how my mind worked about a year ago...

Anyway, I have a couple of blushers already. Although I do like my original blushers, I found them either too sparkly, or a tad too dark to wear on an everyday basis. After purchasing the Benefit bronzer Hula, I thought I would give one of their blushers a whirl in the hope it would be nice and discreet like Hula is.

 I absolutely love Benefit packaging as so much though has gone into the designs and colours used for their different products, resulting in the most perfect packaging! The little cube that is Sugarbomb is fairly metallic, with a gold toned pink on most of the cube. A black and metallic orange make the packaging a bit more snazzy, and sort of remind me of a tiger? The metallic of the colours represents the "Sugar" of the product, and the sparkle of it, I think. 


The blush itself is made up of four quarters. I would describe the colours as terracotta, a rose pink, a sugary pink and a lavender. The result of all four of these colours is so feminine and delicate. This blusher adds a subtle glow to my skin that adds some dimension to my face. It adds the colour back into my foundation- covered face, but ever so subtley, and in a way that does not make it look like I had severe burning cheeks from embarrassment. 

Overall, this is such an amazing product, like the rest of Benefits collection. Let me know if you have this product and like it as much as I do guys, or if there are any other blushers you really like!

Speak Soon,
Stephanie


Urban Decay Naked 3 Palette

Hello Everyone!
I hope you all had amazing an amazing Christmas! I was very spoilt this year and got lot's of amazing presents from my family! One of the gifts being the Urban Decay Naked 3 Palette.


I've wanted one of the Naked palettes for so long after seeing the hype of how good they are, and because I absolutely love wearing nudes and browns on my eyes... so it's only natural that I wanted this amazing palette of gorgeous eye shadows!


I really like the palette itself, as I love the colour of the tin! It's hard to describe, a muted bronze maybe? It also feels quite chunky- but in a good way- so the product seems of a good quality and that it's made of good quality stuff! Also, it ensures me the eye shadows are well protected if I were to ever drop this, which is highly likely. Oops. 
The palette comes with a large mirror in the lid, and also a good quality brush positioned just below the eye shadows. 

Above is a photo of the mesmerizing eyeshadows themselves (apologies that the ones on the right hand side aren't in focus, that's my dodgy camera work!). The majority of shadows are glittery and shimmery in this palette, with only three matte shadows (Strange, Limit, Nooner). The colours progress left to right from light to dark; pinks to bronzes, to dark greys/ black. The colours are absolutely beautiful and all work well together, so even if you're not a professional make-up artist, it is hard to do wrong with these colours. My favourite colours because in my opinion are the prettiest, are Dust, Buzz, Factory and Mugshot.

I really love this palette and am so grateful my Mum bought it for me for Christmas! I may upload some make-up looks using the shadows in this palette, just for a bit of fun and experimentation!

Speak Soon, 
Stephanie x


Wednesday 10 December 2014

Being A Stressed Student!

Hello Everyone!
You may not know but I am currently at college studying for my A-Levels, and am in my second year... and so stressed! Last year was bad enough, but this year features even more work, stress, and responsibility. I have to balance lessons at college, homework, revision, my Saturday job, and some sort of social life/ hobbies. This is quite hard to deal with at times when there really aren't enough hours in the day.

I'm going to share a couple of tips of how to keep above water when you feel like you are sinking under a sea of stress. 

  1. Simply, just stop and breathe. When you physically feel like you are going to have a break down and feel like you can't breath, just stop what you are doing. Close your eyes and take a deep breath. This will immediately help to calm you, and reduce some of the physical features of feeling so overwhelmed. 
  2. Keep a diary. I like to write down every day what I've been up to, and how I've been feeling. This really ensures you notice your feelings, and highlights to you if there are any patterns of your feelings, or what you do in a day that makes your stress levels feel better or worse.
  3. Partake in light activity. I don't always have time to go swimming (which I find really helps to calm me and relieve stress), but I try to do something each day, no matter how small, to release those endorphins that make me feel chilled. Walking my doggy, Bailey, or doing some Results With Lucy workouts are my fav choices. 
  4. Keep organised. This is more of a preventative strategy than a way of dealing with stress. If I keep my life organised (writing down homework/ appointments etc.), keep up to date with my deadlines and make sure I plan ahead, then I find my anxiety levels and stress levels are reduced considerably.

I usually work well under stress, and am currently still doing well even under such pressure. Sometimes, however, it does all get a bit much. This is 100% natural though, and everyone feels like this from time to time, so none of us stressed individuals are alone!
 I hope some of my little tactics help you to feel a bit more chilled and that you aren't too stressed out!

Speak Soon,
Stephanie x

Tuesday 9 December 2014

Dior Powder Eyebrow Pencil

Hello Everyone!
It has been so long since I last did a post, I can't believe it!

I always struggle with my eyebrows. I haven't over- plucked my eyebrows at all, but I do like to fill in the more sparse areas, and create more of a neatened shape to them. I can never seem to do this well, and end up with either uneven, or too dark brows. So I recently purchased the Dior Powder Eyebrow Pencil, as I felt my brows deserved some better attention!


 I love this pencil as it looks so glamorous and just amazing. The packaging is chic and glossy, and the actual pencil itself just feels of really good quality... If that makes any sense at all! I just love it! (Excuse the grainy photos, I used my phone for these). 


I didn't realise when I ordered this product, but it comes with a sharpener! I am so glad as I have lost the pencil sharpener I owned previously. 


This pencil comes with a spoolie on one end which I use to brush through my brows before applying the product. This is really handy as I don't have to keep switching between a pencil, and a separate spoolie. 


I bought this pencil in "Blonde" as I have sort of blonde, highlighted hair. The colour is really good as it's not too light, so it still goes with the darker, non dyed parts of my hair, but isn't dark which prevents myself from looking like I have "Scouse Brows". 

I love the consistency of the product, it is light and powdery *duh* and just feels so velvety and luxurious. Only a little is needed to be applied to fill in any sparse areas, and it looks so natural. 

I hope you liked this post guys!

Speak Soon,
Stephanie x

Saturday 29 November 2014

How To Make Your Hair Luscious and Shiny

Hi Everyone!

Tomorrow evening is my works Christmas party! I'm really excited for it as we are going up to London and cruising the Thames on a boat! I want my hair to look extra shiny and glossy so I am going to create my own deep conditioner... of sorts.

This is in no way a beauty break through and I'm sure many of you know of this tip already, but here goes anyway. 

It is very simple! I get a little pot and a spoon, and select my favourite conditioners. These can be deep conditioners or just the average type. All of the ones I have are for dry, damaged hair.

 I then squirt about a 2p size of each conditioner into the pot, and mix. 

Then, when in the shower, I coat the mid- to end lengths of my hair and leave it to soak in.

After about five minutes or so I rinse out the conditioner potion, (thoroughly as otherwise my hair will be heavy with product, lank and greasy).

And there we have it! Soft, shiny hair!

This was just a quick, random little post for you all and I hope you like it!

Speak Soon,
Stephanie x

Wednesday 19 November 2014

Simple Christmas Nails!

Hello Everyone!
I hope you're all good! I know it's a little while until Christmas yet, but it's never too early to sport some Christmas nails! This is just a little blog post, with an idea for you of how to do your nails this Christmas season! This is a very simple design, with only a couple of nail polishes needed!

Base/ Top Coat
 First of all, you will need a clear nail polish to use as a base coat, and you will also need this later on for a top coat. Any clear nail polish is suitable, I used this Seventeen one which I found in my nail polish collection. You should always use a base coat, but it is especially important when using a red colour just incase it stains your nails.  

Deep Red
Next, use a red colour on all of your nails, apart from the ring finger on each hand. I used this Tanya Burr nail polish in "Riding Hood" which is such a lovely deep red colour. I love Tanya's nail products as they're such lovely colours, and also they don't chip for about a week! I did two coats of this colour to ensure the colour was opaque and strong.

Silver 
Use a silver colour to put on the ring finger that you left, earlier. I used this 2true one that I found in my nail polish collection which is actually really good! I forgot that I had this one, and am glad I found it again! Again,I did two coats of this. 

The Finished Look
I took this photo with the flash so you can see the true colours of the nail polishes. I really like this look as it was so quick and easy to do, but it looks quite glam! The silver on the ring finger takes this nail look from boring red to Chritmassy and sparkly! 

I hope you like this post guys, and that you give this nail look a try! 
Speak Soon,
Stephanie x

Sunday 16 November 2014

How To Make A Small Bedroom Look Bigger, and Cosy!

Hi Everyone!
For many years I have been unimpressed by my small bedroom! It was always cluttered with things,with clothes on the floor as there wasn't enough storage space. I yearned for a double bed but my parents said that it wouldn't fit. My room basically felt disorganised, not very homely, and tiny. 
Recently, however, I have redecorated my bedroom and I absolutely love the result! It feels so much bigger, and so cosy and organised, too!

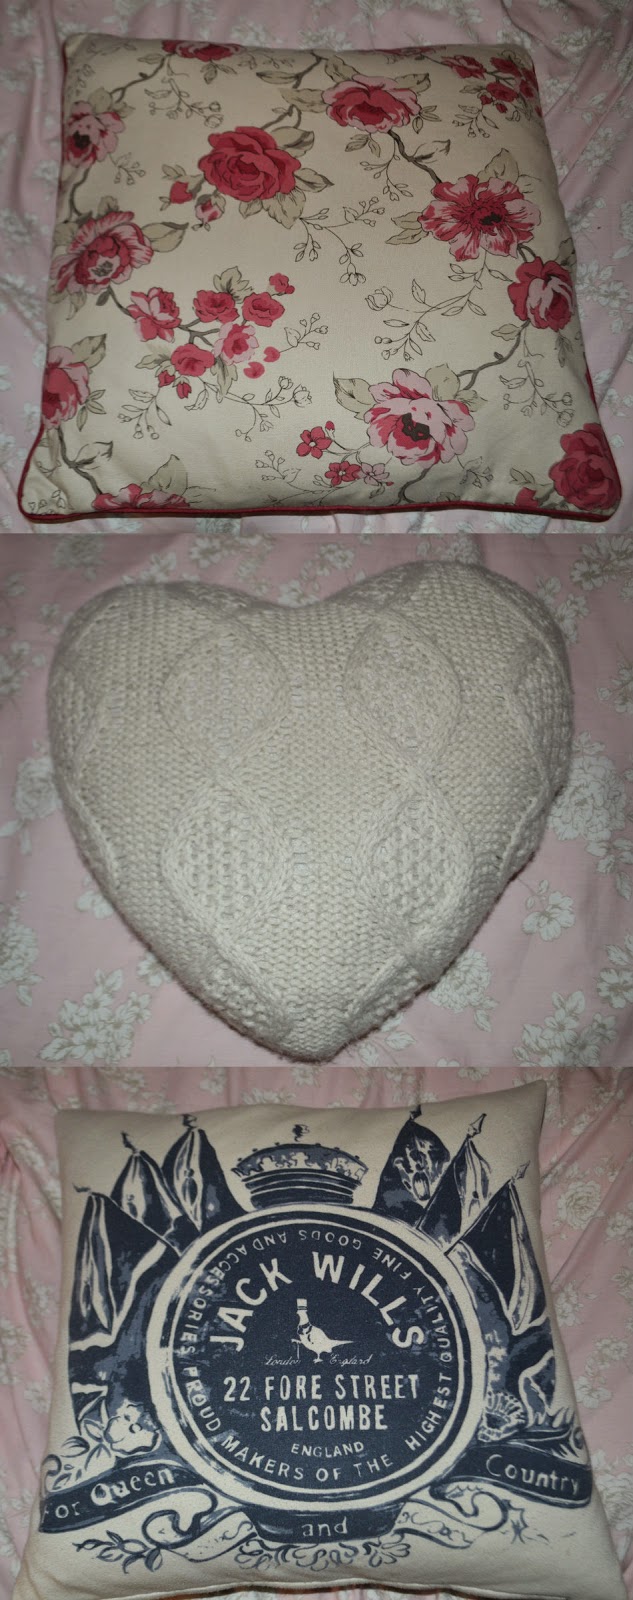
Cushions
From top to bottom: Homebase, Sainsbury's, Jack Wills.  I love these cushions I have on my bed! I like how they don't match each other, but how they seem to just work. I love the floral print on the top cushion, as it's very feminine. The knitted heart is just plain and simple cute and cosy, and I find the pattern on the Jack Wills cushion so "British" and vintage.

Duvet Cover
When choosing all of the accessory bits for my bedroom, I knew I wanted floral, vintage, and mismatching prints. I got this pale pink duvet cover with a white floral print from Sainsbury's. I really like it as I think it looks both "pretty" but also quite vintage due to the colourings (the pale brown outlining of the white floral pattern).

Bedside Light
I got the base of this lampshade from my Mum, as she was throwing it out. I then went to Homebase and purchased this amazingly cute lamp shade. I LOVE the colour of this, and feel that it prevents my room from being too pink and risking it from looking childish. 

Candles!
Candles will always make a room look cosy, and they'll make it smell nice too! The candle on the left hand side, in the jar, is a Yankee Candle, in the scent Snowflake cookies...it is AMAZING. The other three are from Sainsbury's and I love the cute pink packaging. 

Flower in Vase
I thought this pink rose would look really cute and romantic when placed in a glass, vintage bottle. I feel it adds a fresh feel to my room, and ties in well with all of the floral prints in my room.

Refurbished Chest of Drawers
This pine chest of drawers used to all be the deep pine colour that the knobs are. As you can imagine this made my room like tiny as it was so dark and seemed like it took up a lot of space. To save myself from having to buy a complete new chest of drawers, I decided I would just paint this one! The colour is an off white, and makes the piece of furniture look so much smaller and light in my room. I wasn't 100% careful when painting this as I thought if it was chipped it would add to the character of it, and make it seem more vintage. 

Storage for my Contact Lenses
I wanted a fun, interesting way to store the many products and items I have, so for my contact lenses, I decided to use to mini buckets, and two tin cans. This looks quite old fashioned I find, and I love it! It prevents my room from looking too boring and floral and girly. It's cheap too!

Polaroid Photos
For my 18th Birthday my cousin bought me a Polaroid camera, which I am in love with! I wanted a way of displaying these photos which was a bit different. So I bought some string, and some white, heart pegs from John Lewis and hung them up on my wall.  

Peg Fairy Lights
I've always wanted fairy lights in my room as they manage to create such a calming lighting. I bought these peg fairy lights from Homebase, and I think they are of the brand Habitat. They're so cute, and add more light to my room making it feel more spacious. The mirror you can see in the right hand picture has an elaborate silver frame, which adds an essence of glamour to my bedroom. By it being on the back wall and therefore reflecting the rest of my room, there is the illusion that my room is bigger than it actually is. 

 Lamp Shade
Another product from Homebase is this cream lampshade with a pink floral print. I used to have a dark raspberry one which really darkened the room, but this one just adds to the lightness of my room! It's amazing how such small changes like this can impact the feel of a room. 

Jewellery Box
Another different idea for storage, is this tea box which I bought from Homebase, I use this to keep all of my jewellery in, and I keep my everyday pieces on top of it. I think this looks a lot nicer than a bold jewellery box, and is very cute and vintage. 

Others ways I made my room seem a bit bigger, was getting a light cream coloured carpet, instead of the wooden flooring I had initially. This immediately lightened up the whole room, and made it feel warmer too. I also rearranged my bed so it is against my back wall, instead of it being down the side of my room, by the window (I may add, I bought a small double bed, which fits in my room nicely).
These are just a few tips on how to make a room seem a bit bigger, and a lot more cosier with more character. I hope you liked this post guys, let me know what you think!

Speak Soon,
Stephanie x

Thursday 13 November 2014

My Everyday Jewellery

Hi Everyone!
Now, I never used to wear jewellery much, and if I did I would wear statement necklaces to spice up an outfit, and always the same pair of earrings. That would be it... boring I know! Over the past year I have built up my jewellery collection, and have finally got to the stage where I wear jewellery every day. I'm going to show you my staple pieces that I wear everyday, and that I adore oh so much.

Pandora Earrings
I got these earrings from my parents for doing well in my AS Level results. I really like them as they're very cute and girly, but sophisticated too. I've worn them every single day since receiving them from my parents!

Pandora Ring
I absolutely adore this ring which was given to me by my best friend for my 18th birthday recently, which matches my earrings. I love the simple, prettiness of the rose; it's very delicate and tasteful. 

Fossil Watch
I bought this watch with my first ever pay check from my first proper Saturday job, at a department store. I was nervous about purchasing it as I didn't know if I'd wear it every day and if it would be a waste of money, I was also nervous people would think the colour is too "chavvy". But I absolutely love it! I've had it for two years now and wear it all the time! Recently it has started to show signs of wear, like the metal becoming a little tarnished on the strap, and one of the time lines coming unattached, but to me this makes it even more mine, and show's it's loved. 

Swarovski Bangle 
Another 18th birthday present, this time from my uncle and his wife, and I absolutely love it! It's very blingy, but I love that! Some of you may think this is too much for everyday wear, but I love it and find it makes some of my plain outfits more interesting and glamorous.

Tiffany Bracelet
Again, a present for my 18th from my parents. I love this bracelet as it's so dainty, and it has sentimental value as I'll always remember it as a gift from my parents for my 18th. The only thing I will say about this bracelet is the heart is quite delicate so is already fairly scratched, which puts me off of wearing it too often. 

Boutique Necklace and Tiffany Charm
My Mum and I got these necklaces, matching, with our names on them a few years ago now from a local jewellers which has since shut down. I think it's a really cute touch to have our names on the heart, and I like how my Mum and I are connected through this necklace. The engraved heart came on the chain, and with the little pink freshwater pearl and a baby pink bow (which has since fallen off). We both then bought a charm from Tiffany to add to the necklace when we visited America, which is so adorable and makes the necklace even more special.  

I just want to stress I'm not in any way trying to show off, I just thought I'd share what jewellery I wear on a day to day basis! I hope you like this post, and I'd love to know your jewellery staples!
Speak Soon, 
Stephanie x

Tuesday 11 November 2014

Healthy Snack- Chocolate and Almond Popcorn!

Hello Everyone!
I hope you are all well! 
Today I thought I'd do a post inspired by Miss Niomi Smart, who I'm sure you've all heard of... and if not then you are missing out on her cute blog posts and girly videos! 
I have such a sweet tooth but I am trying to eat healthily, so when I saw her recipe for healthy popcorn I was so excited!
Follow these steps if you want to make delicious popcorn drizzled with melted dark chocolate and crunchy almond butter!

Ingredients


These are the ingredients you will need:
Popcorn Kernals (Top Left)
Dark Chocolate (Top Right)
Almond Butter (Bottom Right)
I don't have any measurements for you as I just use what I feel works well. I usually use about 1/4 of the bag of Popcorn Maize, and then use as much chocolate and almond butter as I fancy!

 Step One!

 Pour enough oil into the pan so it completely covers the bottom, and heat it. Then pour in your Popcorn Maize and place a lid on the pan. I like to hold the pan by the handle over the flame myself so it doesn't get too hot and burn, I also shake the pan to prevent this, too. 

Step Two!

 Once all of the kernels have popped, put them into a glass bowl. 

Step Three!

Melt about half a bar of dark chocolate (dark chocolate is healthier than any other chocolate, and I find it  a lot tastier too!) in the microwave on a medium heat, stirring occasionally until it's all melted. Make sure you use a bowl suitable to be microwaved and to stir the chocolate often to prevent it from burning. 

Step Four!
The final step! Drizzle the melted chocolate onto the popcorn, and then follow this by also drizzling on the almond butter! Enjoy straight away whilst still warm (my favourite!) or keep it in the fridge until you fancy a sweet, healthy-ish snack! I also like to put it into a sandwich bag so I can take some to college! 


I hope you feel inspired to try this snack, guys! It is so tasty! There are lots of variations you can all try on this recipe! You could leave out the almond butter, add mini marshmallows to create a Rocky Road type treat, or perhaps add raspberries with the chocolate!

Speak Soon,
Stephanie x


Tuesday 4 November 2014

My Skincare Routine (Combination/ Rosacea)

Hello Everyone!
I hope you are all well and keeping warm now that it's getting a lot chillier! Today, I thought I'd do a post on my skincare routine! My skin type is combination (oily, but also dry), and is super sensitive. I also suffer from rosacea slightly, around my nose and cheeks. I used to absolutely hate my skin, it was really red, scared, and spotty! But finally, I have found a routine that actually works for me, after experimenting with hundreds of bottles of various creams, lotions and potions! My skin still isn't 100% perfect, but then who's is?! I am a lot happier about how my skin feels and looks, and now I've found a routine that works for me, I am actually going to stick to it and not be lazy!


Liz Earle Cleanse & Polish Hot Cloth Cleanser
 I recently got given this as a birthday present from my friend Jess, who is an avid user of Liz Earle products. I was keen to try it after her raving review, and was not disappointed. I pump some of this product onto my hand and then apply it all over my face, rubbing it in  with circular motions. I also dab some gently over my closed eyes. I then soak the cloth that comes with the cleanser in hot water, and gently wipe away. This wipes away the cleanser, and any make-up, dirt or grease on my face. 

Garnier Micellar Cleansing Water
Next, I pour some of this amazing cleansing water onto a cotton pad, and remove any excess eye make-up that may have been left behind. On another cotton pad I also use this to sweep up my neck.

Liz Earle Instant Boost Skin Tonic
 The next step of my skincare routine is to pour some of this skin tonic onto a cotton pad, and sweep over my face to remove any grime the cleanser may have missed (I do find there is hardly any, however, as the cleanser does such a good job). 

Liz Earle Moisturiser 
I then moisturise my skin using, surprise surprise, another Liz Earle product. This is a really light, refreshing moisturiser that doesn't feel greasy at all, but still feels like it is quenching the skin. I find four pumps of this product sufficient to do my whole face. 

Liz Earle Superskin Concentrate
I do not use this product daily as it is so powerful at moisturising and rejuvenating the skin. I was sceptical about using this product when the lady in the shop suggested it to me, as I wouldn't think of using an oil on oily skin. But I love it! I use this about once a week, maybe twice a week in colder months, to give my thirsty skin a quenching treat. It really helps to soothe any dryness due to the rosacea, around my nose and makes my skin feel so soft.

Neutrogena Visibly Clear 2-in-1 Wash and Mask
When my skin is being a bit problematic with a few spots, I reach for this product. I can only really use this product infrequently as it can sting my sensitive skin a tiny bit, but it works wonders when I need it! I only use this as a mask, and apply a layer to problem areas such as my chin, nose, and onto any spots on the rest of my face. I do not cover my whole face in it, however, as I only want it to work on the spots, and to not irritate the rest of my skin which is blemish-free. 

This skincare routine really has helped clear up the blemishes on my face, and has helped soothe my rosacea and reduce the redness.My skin just feels so much healthier, and looks a lot better, too! I hope you like this post guys, and that you find it helpful in any way! 
Speak Soon
Stephanie x

Monday 3 November 2014

Zoella Blissful Mistful Fragranced Body Mist

Hello Everyone!
Most of you probably know of the amazingly talented and beautiful blogger and YouTuber Zoella. She is such an inspiration to me, and I admire all of the work she does. I was delighted to hear she was going to release some beauty products, and as soon as they were released I purchased away! My favourite product by far was her body mist.


I love the packaging of this product. The lid is a brassy-orange, and is a very unique colour. The glass bottle has "Zoella beauty" written in orange (Zoe's favourite colour), and in the font now recognised as Zoe's own. "Blissful Mistful" is written in golden capitals below this. There are white polka dots on the back of the glass bottle which can be seen through the front of the bottle. I really like the design of this bottle as it is both chic and fun! It manages to be appealing to both younger girls, and women in their 20's. 


Blissful Mistful only costs £9.50, so is very affordable making this product easily accessible for anyone who wishes to purchase this delectable body mist. Now I'm not the best at describing fragrances, but  I'll give it a shot! Blissful Mistful isn't ridiculously sweet and sickening, it is subtle and refreshing, with a hint of citrus and and only a dashing of sweetness. This scent is not at all overpowering, it is a "pretty" scent, in my words! This is my favourite scent as it's very feminine but not cloying and sugary like most other scents on the market. 

Speak Soon,
Stephanie x 

Christmas Lush Goodies

Hello Eveyone!
Recently I went shopping and, surprise surprise, I found myself in Lush! I absolutely love Lush, their products are amazing quality and always look amazing, but I also love their company ethics. Now I know Christmas is still a little while away (7 Sundays!), but I just couldn't help myself and had to purchase some of the cute Christmas products available! 

Father Christmas Bath Bomb

I absolutely love this bath bomb! I fell in love with the cheeky grin as soon as I saw this jolly Santa! This bath bomb will make water go red, and then to green (very festive!). This bath bomb smells of the famous Christmas Lush scent, Snow Fairy, an extremely sweet, but not too sickly, scent. 

The Christmas Penguin Bubble Bar

How cute is this little penguin?! This is a citrus-scented cute little guy, who is used to create mounds of bubbles in a bath by crumbling under hot water. He's almost too cute to use though!

Magic Wand Bubble Bar

This is another bubble bar, used by swishing through hot bath water to create lots of magical bubbles. This fairy wand is Snow Fairy scented, and has a cute little bell attached to add to the magical, fairy-like feel. 

Wizard Bubble Bar

This adorable little wizard bubble bar was a Halloween special, but I thought it was too sweet to leave out of this post! Not only does the cuteness calm you enough, the oils in this bubble bar help to reduce stress! I love the purple glitter of the "hat", it's very magical... see what I did there?! 

I hope you liked this post guys! I had fun creating it, and I know I'm in for some lovely, relaxing, skin-softening baths over the Christmas months!

Speak Soon,
Stephanie x